

Ever wondered why your fudge doesn't quite set the way you hoped? Making fudge is a bit of a science, and understanding how long it takes to fully harden can save you from candy catastrophes. Surprisingly, it's not just about time—though that does play a big role. The texture of your fudge depends on how well you balance ingredients and the environment in which it's made.
Good news: getting fudge to harden perfectly isn't as mysterious as it might seem. On average, fudge needs anywhere from three to five hours to set at room temperature. But hold your horses; that's not a strict rule! Factors like the type of ingredients you use, the cooking method, and even the weather can tweak the timeline. If you're eager to dig in, there are some tricks to speed things up without compromising that melt-in-your-mouth feel.
- The Science Behind Fudge Hardening
- Variables That Affect Hardening Time
- Tips to Speed Up the Process
- How to Tell When Fudge is Ready
- Storing Fudge for Best Results
The Science Behind Fudge Hardening
So, what's the magic happening when fudge sets up perfectly? It all boils down to sugar crystals. Sounds fancy? Not really. When you're making fudge, you're essentially getting sugar and fat to play nice together until they cool into that smooth, delightful bite we crave.
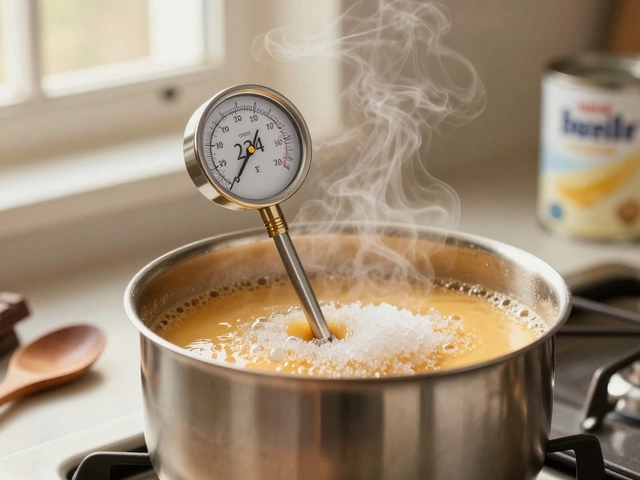
The first pivotal step is dissolving the sugar completely. That means heating it with milk or cream until no grains are left. The cooking temperature is crucial. You want it to hit about 234°F (or 112°C) for that sweet spot, which candy-makers call the "soft ball stage." This is the temperature where the magic happens, forming tiny sugar crystals that give fudge its creamy texture.
Now, how fast it cools down is just as important. If you rush it, you might end up with a gritty mess instead of that melt-in-your-mouth goodness. That's because small sugar crystals are key to a smooth texture, and they need time to form just right. Allowing it to cool a bit before stirring helps control crystal size. Here's a little tip: if you're in a hurry, you can pop your fudge in the fridge to speed things up, but revving things too much might affect its smooth finish.
Once you know these basics, you can experiment and even tweak your recipes. Remember, everyone's setup could be a tad different, so keep an eye on your thermometer and trust your instincts!
Variables That Affect Hardening Time
When it comes to how long your fudge takes to harden, several factors are at play, and understanding them can make a world of difference in your fudge recipes. Let's break down the main ones:
1. Ingredients and Their Proportions: The type of ingredients you use can either speed up or slow down the hardening process. For instance, evaporated milk tends to set more slowly than condensed milk. The amount of sugar also matters a lot. Too much sugar can lead to a quicker set, but it might end up grainy.
2. Cooking Time and Temperature: Fudge needing a longer cooking time at a low temperature may take more time to set. Be patient and don't crank up the heat in a hurry; it can lead to scorching or uneven textures.
3. Ambient Temperature and Humidity: Believe it or not, your kitchen's environment affects your fudge. On hot or humid days, fudge might take longer to harden. If your kitchen feels like a sauna, consider a cooler spot for your cooling process.
4. Stirring Frequency: Stirring your fudge mix too little or too much has its consequences. Consistent stirring at the right intervals prevents the fudge from sticking and helps it achieve the desired texture.
5. Cooling Method: Some folks place their fudge in the refrigerator to speed up hardening time. While this might work, it can also lead to cracks on the surface if done too quickly. Room temperature is usually your best bet for smooth, crack-free fudge.
Adjusting these variables thoughtfully can get you closer to that perfect, melt-in-your-mouth consistency everyone's after. Trying out a few batches might provide insights that turn you into a fudge-making champion.

Tips to Speed Up the Process
If you're impatiently waiting for your fudge hardening time to magically speed up, you're not alone. Thankfully, there are a few tricks up our sleeves to get your fudge ready to enjoy quicker, and none involve compromising that rich, creamy texture.
First off, consider popping that homemade treat into the fridge. Cooler temperatures help reduce fudge hardening time because the cold sets the butter and sugar faster. Just make sure to keep it covered to prevent any unwanted kitchen odors from snuggling up with your delicious dessert.
“Refrigerating fudge can cut down setting time by about an hour,” says culinary expert Sarah Thornton. “Just don't rush it too much or you risk getting a grainy texture.”
Another option is to use an ice bath for your homemade fudge. Once your hot fudge is poured into the pan, set the pan over a larger dish filled with ice. The contact with the cold surface quickens cooling, trimming downtime significantly, but remember to occasionally rotate the pan so it sets evenly.
- Fan power: Place a fan to circulate cool air around the fudge. The constant breeze can lower the setup time by encouraging even cooling.
- Quality ingredients: Using higher quality chocolate and sugar can sometimes create a quicker set.
- Consider thickness: Pouring the fudge into a thinner layer will help it harden faster, so choose a larger pan if time is of the essence.
If you find yourself stuck at the phase where it's not setting as fast as you'd like, try patience as a last resort. Remember, each recipe and condition may react a bit differently, so sometimes gentle tweaking is your best guide.
How to Tell When Fudge is Ready
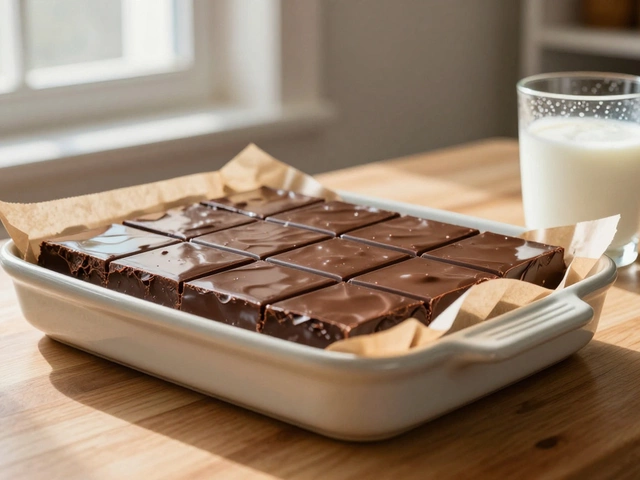
Getting your fudge to the perfect texture is a craft. You might be tempted to cut into it too soon, but knowing when it's fully set is key. So, how can you tell if your fudge is ready?
Firstly, check the surface. A well-set fudge should look matte, not shiny. If it's still glistening, it's likely still gooey inside. But beware! Even if it looks matte, it could still need more time.
Feeling the firmness is another easy test. Gently press the top with a fingertip. It should resist a little but not leave a dent. If your finger sinks in or the fudge feels too soft, it's probably not ready.
Next, you can use the “lift” method. Carefully try to lift the fudge from the edges of the pan. If it comes away easily and holds its shape, you’re good to go. If it starts to bend or break, it needs more time to harden.
- Surface: Should be matte and not sticky.
- Firmness: Should resist a little pressure.
- Lift Test: Bakes evenly and can hold its shape when lifted.
If you’re in a hurry and don't want to wait for room temperature setting, using the fridge can speed up the process. Just make sure it’s covered to avoid dryness.
Patience is key, but knowing these tricks makes waiting a little easier. Once you've nailed these steps, you'll have fudge that’s hard to resist digging into!

Storing Fudge for Best Results
So, you've made the perfect batch of fudge, and now the challenge is keeping it that way. Proper storage is key to maintaining that delicious, creamy texture and ensuring it stays fresh for as long as possible.
The first step to storing fudge is making sure it's properly cooled and set. Once your fudge has fully hardened, wrap it tightly. Use plastic wrap or wax paper for the initial wrap, and then follow up with an airtight container. This double-layer protection is like putting your fudge in a cozy little sweater, keeping moisture out and freshness in.
When it comes to storing fudge, room temperature is usually just fine. Find a cool, dry spot in your pantry where the temperature stays consistent. At room temperature, your fudge will generally stay good for up to two weeks. But if your kitchen gets warm or humid, consider going for the fridge or freezer instead.
If your fudge is headed to the fridge, keep it in an airtight container to avoid absorbing any funky fridge smells. Chilled fudge can last for about three weeks, but remember to bring it to room temperature before serving for the best texture. Freezing is your option for long-term storage. Fudge can last up to three months in the freezer and still taste great. Just make sure it's well-wrapped to prevent freezer burn.
- Tip: Cut your fudge into serving-size pieces before freezing. That way, you can enjoy a piece or two without thawing the whole batch.
- Note: Avoid storing fudge near cooked food in the fridge or freezer where smells can seep into your treats.
By following these storage tips, you’ll keep your homemade fudge tasting fresh and delicious, just like the day you made it.


Write a comment