How to Keep Fudge Soft and Prevent It From Hardening
Learn why fudge hardens and discover practical tips on ingredients, temperature, cooling, and storage to keep your fudge soft and delicious.
If you’re wondering how to prevent fudge from hardening, you’ve landed in the right spot. When working with prevent fudge from hardening, the practice of keeping homemade fudge soft and pliable after it sets. Also known as fudge softening, it saves you from a rock‑hard dessert that’s more trouble than treat.
One of the biggest allies in this mission is fudge storage, the method and environment you use to keep fudge after cooking. Proper storage means choosing the right container, temperature, and humidity level. A tight‑lidded plastic box at room temperature works for short‑term, but if you plan to keep fudge for more than a day, refrigeration or a cool pantry is smarter. Another key player is fudge texture, the smooth, melt‑in‑your‑mouth feel that defines good fudge. Texture hinges on how quickly the mixture cools, how much butter you use, and whether you stir the right amount of time. Too much stirring after the mixture cools can push sugar crystals to form, making the fudge stiff. Finally, refrigeration, a controlled cold environment that slows crystal growth can be a double‑edged sword: it halts hardening if used promptly, but leaving fudge in the fridge too long can dry it out. Balance is key—wrap your fudge in wax paper before placing it in an airtight container, then chill for 30 minutes to set, and let it sit at room temperature before serving.
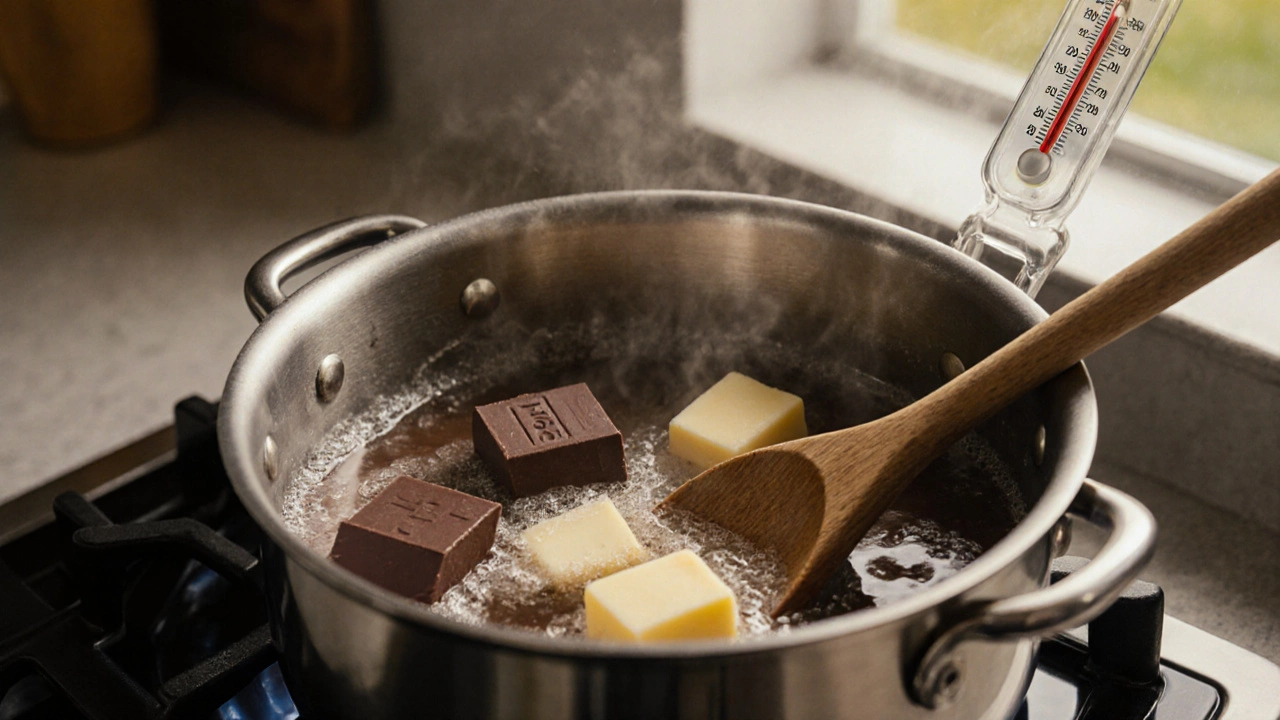
Beyond storage, the way you make fudge, the cooking process from heating to pouring sets the stage for a soft finish. Use a candy thermometer and pull the mixture to 234‑236°F (soft‑ball stage); any lower and the fudge stays overly soft, any higher and it hardens fast. Adding a tablespoon of corn syrup or honey can interrupt crystal formation, giving you a creamier bite. When you pour the hot fudge onto a greased pan, spread it thinly—thinner layers cool faster and stay pliable, while thick slabs risk turning dense. After the fudge sets, a quick flip of the slab onto wax paper lets you cut clean squares without crushing the texture. If you notice grainy bits, you can melt the fudge again, add a splash of milk, and re‑stir; the extra liquid helps dissolve stubborn crystals. And remember, candy making, the broader art of creating confections often uses the same principles—temperature control, proper stirring, and careful cooling—so mastering fudge gives you a solid foundation for toffee, caramels, and chocolate bark.
Armed with these practical tips, you’ll soon know which steps matter most for a soft, melt‑in‑your‑mouth treat. Below you’ll find a curated list of articles that dive deeper into storage tricks, texture science, and rescue ideas for fudge that’s already gone hard. Explore the posts to fine‑tune your technique, troubleshoot common issues, and turn every batch into a smooth, share‑worthy masterpiece.
Learn why fudge hardens and discover practical tips on ingredients, temperature, cooling, and storage to keep your fudge soft and delicious.